
Building Riceland
Introduction
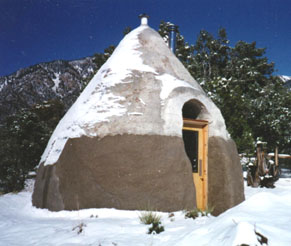 Below is a step-by-step description of how our first
experimental earthbag dome was created. We called this dome "Riceland,"
after the brand name printed on the polypropylene rice bags that were
used to build it. The interior diameter is 14 feet (4.3 meters).
Below is a step-by-step description of how our first
experimental earthbag dome was created. We called this dome "Riceland,"
after the brand name printed on the polypropylene rice bags that were
used to build it. The interior diameter is 14 feet (4.3 meters).
This prototype dome could serve as a model for emergency shelters, cabins, studios, garden sheds, etc. It should work well in earthquake-prone areas and places subject to flooding, winds, and hurricanes. It could be used as quick housing for people made homeless by natural disasters, such as in Nepal, Pakistan, Turkey, Iran, Indonesia, India, Sri Lanka, and El Salvador.
If you are interested in finding out more about this method of building, see my general earthbag page or the Questions and Answers pertaining to earthbags. Also there is another website devoted entirely to this: www.earthbagbuilding.com.
Level the Site
 First you want to select a building site for the dome that
is well-drained, where water will not tend to collect. Then you can mark
the very center of where the dome will stand with a stake that will remain
there until the dome is near completion. Using a string or rope attached
to this stake as a radius (in this case 7 feet plus an extra 2 feet...or
9 feet...just under 3 meters), mark the perimeter to be leveled.
Using a shovel and a level, clear the area of debris and get the circular
area more or less level.
First you want to select a building site for the dome that
is well-drained, where water will not tend to collect. Then you can mark
the very center of where the dome will stand with a stake that will remain
there until the dome is near completion. Using a string or rope attached
to this stake as a radius (in this case 7 feet plus an extra 2 feet...or
9 feet...just under 3 meters), mark the perimeter to be leveled.
Using a shovel and a level, clear the area of debris and get the circular
area more or less level.
Dig the Perimeter Trench
 In areas where heavier soils might not drain well, it is important to
create a rubble trench foundation for the dome. This helps keep moisture
from wicking up into the bag wall, as well as keeps the wall from "heaving"
if the ground freezes. Using the same center stake, mark the interior
circle of the wall and also the exterior circle (this depends on how
wide your bags are.) Also mark where the entrance will be located, allowing
enough space for a door and its wooden or steel frame. Note that this
entrance footing jogs inward to support the vertical door once the dome
slopes inward.
In areas where heavier soils might not drain well, it is important to
create a rubble trench foundation for the dome. This helps keep moisture
from wicking up into the bag wall, as well as keeps the wall from "heaving"
if the ground freezes. Using the same center stake, mark the interior
circle of the wall and also the exterior circle (this depends on how
wide your bags are.) Also mark where the entrance will be located, allowing
enough space for a door and its wooden or steel frame. Note that this
entrance footing jogs inward to support the vertical door once the dome
slopes inward.
Fill the Trench with Cobbles
 Gather, or have delivered, the rubble to fill the trench with. This
can be small stones, gravel, or "urbanite" (broken up concrete
debris). You may notice that this trench was lined with a wire mesh.
I did this because our soil is a loose sand that would easily cave in
and fill the voids of the rubble, but this is likely not necessary with
most soils.
Gather, or have delivered, the rubble to fill the trench with. This
can be small stones, gravel, or "urbanite" (broken up concrete
debris). You may notice that this trench was lined with a wire mesh.
I did this because our soil is a loose sand that would easily cave in
and fill the voids of the rubble, but this is likely not necessary with
most soils.
How High to Fill the Trench?
This depends on whether you want to recess the first row (or rows) of bags into the trench or not. We laid the first row of bags at ground level. In situations where flooding or earthquakes might occur, it may be advantageous to recess the bags into the ground, so that even if the soil surrounding the dome is undermined, the dome itself would likely not be affected.
What Kind of Bag to Use?
We used standard 50 pound misprinted polypropylene rice bags, which can be purchased in bales of 1,000 each. If you are going to fill the bags with loose material, it is pretty much imperative to use the poly bags, because they are stronger and will not deteriorate once they are plastered. If you intend to fill the bags with an adobe or stabilized material, then burlap or other natural materials for the bags may work, because once the wall has set up, the strength of the bag is not so important. The 50 pound size of bag is about right for most applications; the wall will be about 15 inches (38 cm) thick when plastered. If you have larger bags, they might be used at the base, and if you have smaller bags, they might work near the top of the dome. It is also possible to use poly tubing that can be purchased in great rolls, but I prefer the individual bags for several reasons: 1) the bags are cheaper 2) one person can do the work 3) each bag is quite light...about 35 pounds (16 kg) when filled with scoria, and 4) with the seam at the base of the bag, it tends to stay where it is put, whereas the tubing has a tendency to roll, especially when filled with loose material.
Filling the Bags
 Now the bags can be filled with whatever material you decide to use for
this. We used a locally mined, crushed volcanic rock (called scoria) because
it is lightweight and highly insulating. You might be able to use the
local soil from your site, especially if you live where the climate is
fairly moderate, or if you don't intend to inhabit the structure. I say
this because just soil alone doesn't provide insulation. Other possible
insulating materials include rice hulls or perlite. Note that the rice
bag is being held open with a large steel funnel (part of a chicken feeder).
Leave about 8 to10 inches (20-25 cm) of space at the top of the bag to
allow this to be folded over when the bag is placed on the wall to seal
the contents in. We used two bags (one placed inside another) on the first
course to help protect the bags from rupture on any sharp rocks.
Now the bags can be filled with whatever material you decide to use for
this. We used a locally mined, crushed volcanic rock (called scoria) because
it is lightweight and highly insulating. You might be able to use the
local soil from your site, especially if you live where the climate is
fairly moderate, or if you don't intend to inhabit the structure. I say
this because just soil alone doesn't provide insulation. Other possible
insulating materials include rice hulls or perlite. Note that the rice
bag is being held open with a large steel funnel (part of a chicken feeder).
Leave about 8 to10 inches (20-25 cm) of space at the top of the bag to
allow this to be folded over when the bag is placed on the wall to seal
the contents in. We used two bags (one placed inside another) on the first
course to help protect the bags from rupture on any sharp rocks.
Laying the Bags
 Using the trench as guide, place the first row of bags down over the
rubble in a neat row. It is important to carefully place each bag so
that the folded-over flap at the top lays snugly against the bottom
of the previously laid bag, so that each bag gets completely sealed.
Also, note that before each bag is placed, a piece of polypropylene
twine (about 5 feet long...1.5 meters) can be put below it to
eventually tie around two courses above the bag.
Using the trench as guide, place the first row of bags down over the
rubble in a neat row. It is important to carefully place each bag so
that the folded-over flap at the top lays snugly against the bottom
of the previously laid bag, so that each bag gets completely sealed.
Also, note that before each bag is placed, a piece of polypropylene
twine (about 5 feet long...1.5 meters) can be put below it to
eventually tie around two courses above the bag.
Tamping the Bags
 Once a course of bags is placed, it should be thoroughly tamped to make
the fill material as compact as possible, so that the dome walls don't
settle much as the wall proceeds. I used a variety of methods and tools
for doing this, from simply stomping on the bags with my shoes to using
homemade tampers. My favorite tamper is pictured here. It is quite heavy,
which means that even though it takes work to lift it, you don't have
to put as much muscle into the down-stroke. Also, the base of this tamper
is about as wide as the bag is, so one tamp will cover the entire width
of the bag.
Once a course of bags is placed, it should be thoroughly tamped to make
the fill material as compact as possible, so that the dome walls don't
settle much as the wall proceeds. I used a variety of methods and tools
for doing this, from simply stomping on the bags with my shoes to using
homemade tampers. My favorite tamper is pictured here. It is quite heavy,
which means that even though it takes work to lift it, you don't have
to put as much muscle into the down-stroke. Also, the base of this tamper
is about as wide as the bag is, so one tamp will cover the entire width
of the bag.
Placing barbed wire
 As the courses proceed, the other important element is
that two strands of 4-point barbed wire should be spaced about 4 inches
(10 cm) in from each side of the bags. This can be weighted into place
with bricks or stones until covered with the next course of bags. The
barbed wire has two functions: 1) it helps lock the bags together and
2) it helps resist any tendency for the wall to expand outward with the
weight from above. This wire should be placed between every course as
the wall goes up.
As the courses proceed, the other important element is
that two strands of 4-point barbed wire should be spaced about 4 inches
(10 cm) in from each side of the bags. This can be weighted into place
with bricks or stones until covered with the next course of bags. The
barbed wire has two functions: 1) it helps lock the bags together and
2) it helps resist any tendency for the wall to expand outward with the
weight from above. This wire should be placed between every course as
the wall goes up.
Adding more Courses
 The first several courses will be placed pretty much vertically,
above each other. The bags should overlap in a brick-like pattern (running
bond) as the wall goes up. This makes for stronger bonding of the wall.
You can see that the poly twine from two courses below the top course
has been tied at the top to also create a more integrated wall and to
give the eventual plaster something positive to grip onto.
The first several courses will be placed pretty much vertically,
above each other. The bags should overlap in a brick-like pattern (running
bond) as the wall goes up. This makes for stronger bonding of the wall.
You can see that the poly twine from two courses below the top course
has been tied at the top to also create a more integrated wall and to
give the eventual plaster something positive to grip onto.
Measuring Where to Place the Bags
 A simple way to create a stable shape for the dome is to
use a pole that is exactly the length of the interior diameter (14 feet, 4.3 meters in this case) as a guide. If you place the pole
at the bottom of the perimeter and then pass it through the vertical line
marking the very center of the dome, the end of this pole will describe
an appropriate arc for the shape of the dome. This works up to loft level
(about 8 feet 2.5 meters high), and then the upper part of the
dome is best kept as an actual cone shape, using a 30/60 degree right
triangle as a guide. A simple tripod guide can be erected above loft level
to help place the bags. Doing this assures that none of the bags are corbelled
inward too abruptly, and also gives the loft more head room.
A simple way to create a stable shape for the dome is to
use a pole that is exactly the length of the interior diameter (14 feet, 4.3 meters in this case) as a guide. If you place the pole
at the bottom of the perimeter and then pass it through the vertical line
marking the very center of the dome, the end of this pole will describe
an appropriate arc for the shape of the dome. This works up to loft level
(about 8 feet 2.5 meters high), and then the upper part of the
dome is best kept as an actual cone shape, using a 30/60 degree right
triangle as a guide. A simple tripod guide can be erected above loft level
to help place the bags. Doing this assures that none of the bags are corbelled
inward too abruptly, and also gives the loft more head room.
For Email contact go to About Us
Established in 2001, GreenHomeBuilding.com is primarily a labor of love. Kelly, and the GreenHomeBuilding team of experts, have answered thousands of questions for readers over the years, and we continue to publish up-to-date information about increasingly important sustainable architecture. If you feel moved to assist us in this work, your kind donation would be much appreciated; this can be easily done through our PayPal account:

VISIT OUR OTHER WEBSITES:
[Natural Building Blog] [Earthbag Building] [Dream Green Homes]
Disclaimer Of Liability And Warranty
I specifically disclaim any warranty, either expressed or implied, concerning the information on these pages. Neither I nor any of the advisor/consultants associated with this site will have liability for loss, damage, or injury, resulting from the use of any information found on this, or any other page at this site. Kelly Hart, Hartworks LLC.