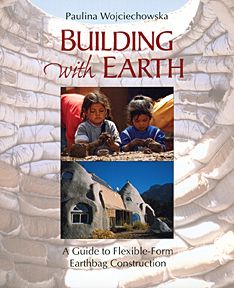
Earthbag
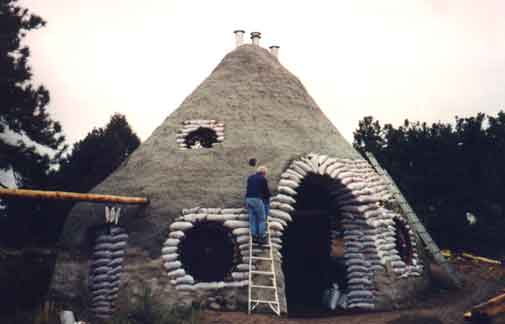
Building with earthbags (sometimes called sandbags) is both old and new. Sandbags have long been used, particularly by the military for creating strong, protective barriers, or for flood control. The same reasons that make them useful for these applications carry over to creating housing: the walls are massive and substantial, they resist all kinds of severe weather (or even bullets and bombs), and they can be erected simply and quickly with readily available components. Burlap bags were traditionally used for this purpose, and they work fine until they eventually rot. Newer polypropylene bags have superior strength and durability, as long as they are kept away from too much sunlight. For permanent housing the bags should be covered with some kind of plaster for protection.
There has been a resurgence of interest in earthbag building since architect Nader Khalili, of the Cal-Earth Institute, began experimenting with bags of adobe soil as building blocks for creating domes, vaults and arches. Khalili was familiar with Middle Eastern architecture and the use of adobe bricks in building these forms, so it was natural for him to imagine building in this way. The Cal-Earth Institute has been training people with his particular techniques, and now the whole field has expanded considerably with further experimentation by his students and others.
I have taken Khalili's ideas of building with earthbags that are laid in courses with barbed wire between them, and come up with some hybrid concepts that have proven to make viable housing. Instead of filling the bags with adobe soil, I have used crushed volcanic rock. This creates a very well insulated wall (about as good as strawbale) that will never rot or be damaged by moisture. As a covering for the earthbags I used papercrete (see the papercrete page). This worked to seal the bags from the sun and the weather, without necessarily creating a vapor barrier...the walls remain breathable. But papercrete may not be sufficiently durable or a good choice in warm and humid climates because mold could form on it.
For a much more thorough look at every aspect of earthbag building, you might visit my other site: www.earthbagbuilding.com
ARTICLES:
A Short History of
Earthbag Building
How to Build a Small Earthbag Dome
The Earthbag Architecture
of Akio Inoue
Building with Unbonded Pumice
Lunar and Terrestrial Sustainable Building Technology in the New Millenium: An Interview with Nader Khalili
REVIEWS:
Earthbag Building
Rebuilding Nepal, One Earthbag at a Time
EXPERT
ADVICE
with Kelly Hart

|
The media shown below are arranged according to when they were published, with the most recent ones at the top. Other resources for earthbag building are also shown. If you click on one of the images you will be taken to a page at Amazon.com where you can find out more about the product. If you end up buying something, greenhomebuilding.com will receive a small commission that will help cover the cost of maintaining this website. Thanks for your patronage.


Plans
Native Spirit
Dr. Owen Geiger, Designer
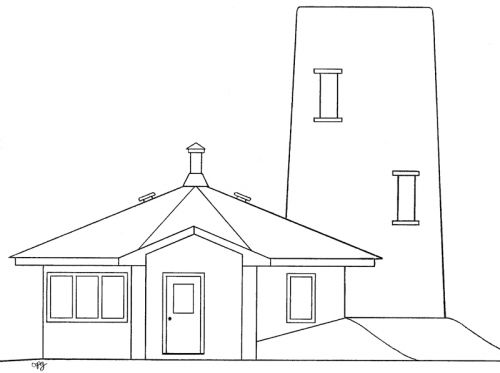
East Elevation
The Native Spirit house plan blends a hexagonal dwelling with a soaring tower, all built of earthbags. If one chooses, the un-bermed portion of the main house can be built with strawbales. The first floor of the tower serves as a cool pantry that keeps food cool without electricity. Other levels can be used as office space, a second bedroom or storage. The top level is an observation deck - truly a stunning feature in such an affordable home. The hollow, central column in the main structure can be built with stone or CEBs (compressed earth blocks). The stove pipe runs up through the column and the thermal mass helps stabilize indoor temperatures. Large south-facing windows create an attractive plant shelf and provide excellent solar gain. Other features include a large built-in bench, fold-out bed and home office. An airlock entry has a washer and dryer, coat closet and bench.
Specifications: 565 sf interior, plus 291 sf tower (4 levels) for a total of 856 sf; 1 bedroom (fold-out bed), 1 bath, plus cool pantry and 2 bonus rooms.
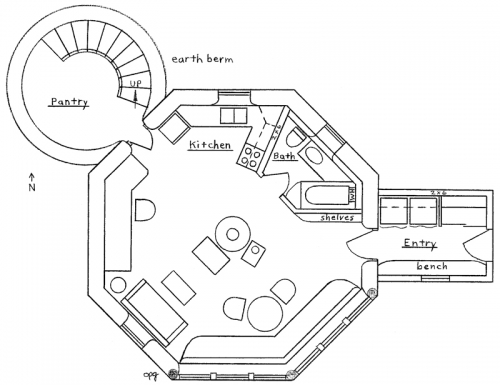
Floor Plan
For more information about this plan, and many others, visit our sister site www.dreamgreenhomes.com, where you will find a wide range of plans for sustainable homes, greenhouses, small buildings, garages, and food storage space for sale. Dream Green Homes is a consortium of outstanding architects and designers, who have pooled their talent and expertise for your benefit.
Informative Links
GENERAL
earthbagbuilding.com is absolutlely the most informative site about earthbag building, created by Kelly Hart and Dr. Owen Geiger.
simpleearthstructures Patti Stouter has assemble this site that focuses on her work with earthbag concepts for inexpensive and sustainable housing.
calearth.org Nader Khalili's earthbag works.
superadobeserrano.blogspot.com this blog-style site is in Spanish, but you don't have to know that language to enjoy the many photos and videos of superadobe constuction in Argentina.
EDUCATION
earthhandsandhouses.orgrun earthbag workshops around the world, based on real building projects: their next workshop is in Thailand in February 2014 and there will be one or more held in Europe in the summer of 2014.
homegrownhideaways.org conduct regular workshops mostly in Kentucky.
earthenhand.com conducts workshops that involve earthbag building, mostly in the Northwestern US.
calearth.org Nader Khalili's earthbag works.
naturalhomes.org lists workshops from around the world, some relating to earthbags.
guidingstarcreations.blogspot.com offer a veriety of earthbag workshops mostly in Australia and Bali.
earthbaghouse.com has general information, work/trade opportunities, workshops, etc.
permastructure.com.au conducts earthbag workshops ion Australia.
AuwaEarth.com offers a variety of earthbag and earth construction workshops in Australia and Brazil.
ulewatitlan.com provides workshops on earthbag building and accomodations at Lake Atitlan, Guatemala.
Espiritu y Lluvia : Centro de Permacultura y Bioconstrucción Aplicada. (Spirit and Rain: Permaculture and Bio-building Centre) located in Argentina conducts earthbabg workshops throughout South America.
www.tsatsa-house.com has conducted workshops in India and Japan.
ENGINEERING
structure1.com Precision Engineering has embraced earthbag building and is prepared to provide structural engineering for earthbag projects.
SPECIFIC WORKS
earthhandsandhouses.org the construction of Paulina Wojciekowska's earthbag dome project in Poland. is shown under projects/sandbags...
motherearthnews.com an extensive article by Owen Geiger about how he built a small earth-sheltered earthbag dome.
caicosdream show Doni Kiffmeyer and Kaki Hunter working on an earthbag project.
calearth.org a tour of CalEarth Superadobe structures.
themlambeproject.org describes the construction of various earthbag buildings in Africa.
SUPPLIES
earthbagbuilding.com list many sources for bags and tubing material from around the world.
expressbagger.com manufactures a simple dual bag manual filling device for sandbags.
For Email contact go to About Us
Established in 2001, GreenHomeBuilding.com is primarily a labor of love. Kelly, and the GreenHomeBuilding team of experts, have answered thousands of questions for readers over the years, and we continue to publish up-to-date information about increasingly important sustainable architecture. If you feel moved to assist us in this work, your kind donation would be much appreciated; this can be easily done through our PayPal account:

VISIT OUR OTHER WEBSITES:
[Natural Building Blog] [Earthbag Building] [Dream Green Homes]
Disclaimer Of Liability And Warranty
I specifically disclaim any warranty, either expressed or implied, concerning the information on these pages. Neither I nor any of the advisor/consultants associated with this site will have liability for loss, damage, or injury, resulting from the use of any information found on this, or any other page at this site. Kelly Hart, Hartworks LLC.