
Building Riceland
Page 2
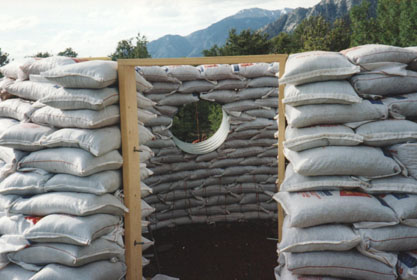
Entance Columns
 In order to stabilize the entrance to the dome, it is necessary to
create massive columns that will help hold the shape that you want and
support the arch over the doorway. I came up with a double-bag arrangement
as shown at right. In order to do this, I needed to completely fill
the bags to the top and then sew or staple a secure hem that would contain
the contents of the bag, even when tamped. The length of these very
full bags would then match the width of two bags laid side-by-side.
You can also see how the column bags are locked into the dome wall bags.
In order to stabilize the entrance to the dome, it is necessary to
create massive columns that will help hold the shape that you want and
support the arch over the doorway. I came up with a double-bag arrangement
as shown at right. In order to do this, I needed to completely fill
the bags to the top and then sew or staple a secure hem that would contain
the contents of the bag, even when tamped. The length of these very
full bags would then match the width of two bags laid side-by-side.
You can also see how the column bags are locked into the dome wall bags.
Door Frame Anchor
 This is one method of anchoring the door frame to the bag column, by
placing a piece of threaded rod between the bags, with chunk of wood fastened
with a washer and nut at one end of it. Then the door frame can be attached
to the other end and tightened against the column. Other approaches to
this are to simply drive a longer piece of threaded rod all the way through
the column and fastening it in a similar way...or to put a piece of plywood
with lots of nails poking through it and a heftier chunk of wood attached
so that this offers something to anchor the frame to later.
This is one method of anchoring the door frame to the bag column, by
placing a piece of threaded rod between the bags, with chunk of wood fastened
with a washer and nut at one end of it. Then the door frame can be attached
to the other end and tightened against the column. Other approaches to
this are to simply drive a longer piece of threaded rod all the way through
the column and fastening it in a similar way...or to put a piece of plywood
with lots of nails poking through it and a heftier chunk of wood attached
so that this offers something to anchor the frame to later.
Merging Column and Wall
 As the column and the wall grow taller, and the wall slants inward
with its natural curve, the two elements will eventually blend into
a simple shape. If you look at the picture above and then at this one,
you can see that the column gets shallower as it rises.( The picture
above is of the one side of a doorway and this picture is of the other
side.) The height pictured here is about where the arch form will be
placed to begin the arch over the door.
As the column and the wall grow taller, and the wall slants inward
with its natural curve, the two elements will eventually blend into
a simple shape. If you look at the picture above and then at this one,
you can see that the column gets shallower as it rises.( The picture
above is of the one side of a doorway and this picture is of the other
side.) The height pictured here is about where the arch form will be
placed to begin the arch over the door.
Attaching the Door Frame
 This detail shows how the wooden door frame is bolted to the bag column
by recessing the nuts so that they will not interfere with installing
the door. Once the frame is cinched up tightly, the excess threaded
rod can be sawed off.
This detail shows how the wooden door frame is bolted to the bag column
by recessing the nuts so that they will not interfere with installing
the door. Once the frame is cinched up tightly, the excess threaded
rod can be sawed off.
Window Frames
 We used standard culvert couplers as window supports in Riceland. These
are inexpensive and come in a variety of sizes, as shown. It is easy
to set the couplers wherever you want, and just stack the bags around
them. It may be necessary to brace them into place until they get locked
in with the bags, but once this happens they become quite firm. They
should be slanted to match the curve of the wall. Notice the blue tarp
at the base of the bag wall; it is used to protect the bags from ultraviolet
exposure of the sun when not working on the project. It's important
to keep the bags covered because the sun does degrade them. So do be
sure to put a finish stucco on when you are done.
We used standard culvert couplers as window supports in Riceland. These
are inexpensive and come in a variety of sizes, as shown. It is easy
to set the couplers wherever you want, and just stack the bags around
them. It may be necessary to brace them into place until they get locked
in with the bags, but once this happens they become quite firm. They
should be slanted to match the curve of the wall. Notice the blue tarp
at the base of the bag wall; it is used to protect the bags from ultraviolet
exposure of the sun when not working on the project. It's important
to keep the bags covered because the sun does degrade them. So do be
sure to put a finish stucco on when you are done.
Door Frame
 This simple 2X6 inch (4X15 cm) door frame will accommodate a wooden door,
or a steel door could be attached to it. The header across the top is
a bit skimpy...a 4X6 inch (10X15 cm) piece would be better. A heftier
header made of logs could support the bags above it without creating an
arch form, if this is desired.
This simple 2X6 inch (4X15 cm) door frame will accommodate a wooden door,
or a steel door could be attached to it. The header across the top is
a bit skimpy...a 4X6 inch (10X15 cm) piece would be better. A heftier
header made of logs could support the bags above it without creating an
arch form, if this is desired.
The Arch Form
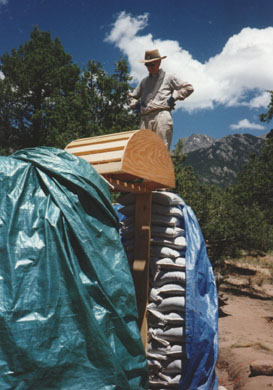 The form for the arch pictured here was made with two pieces of plywood
cut to the right shape, and then 2X4's (4X10 cm's) (about the
length of completely filled bags) were nailed at intervals between the
plywood. This form was then set on top of the door frame. If some shims
fit between the form and what it rests on, then these can be easily
removed when the time comes to release the form. The form can be used
over and over for any arch of this size. Note that the bag wall is covered
with tarps to keep the sun off of them.
The form for the arch pictured here was made with two pieces of plywood
cut to the right shape, and then 2X4's (4X10 cm's) (about the
length of completely filled bags) were nailed at intervals between the
plywood. This form was then set on top of the door frame. If some shims
fit between the form and what it rests on, then these can be easily
removed when the time comes to release the form. The form can be used
over and over for any arch of this size. Note that the bag wall is covered
with tarps to keep the sun off of them.
Placing the Bags over the Form
 Completely full bags that have been securely hemmed at the top are used
to make the arch. The bags are placed in such a way that they radiate
outward, and should be tamped into place. Proceed by placing the bags
symmetrically on either side of the form. When you get to the top, it
is a bit tricky to get the last few bags into place; it may require some
persuasion with a piece of plywood or something to get them to slip into
place. Do not remove the form until the wall of the dome has completely
covered it, or else you run the risk of the arch splaying out and collapsing.
Completely full bags that have been securely hemmed at the top are used
to make the arch. The bags are placed in such a way that they radiate
outward, and should be tamped into place. Proceed by placing the bags
symmetrically on either side of the form. When you get to the top, it
is a bit tricky to get the last few bags into place; it may require some
persuasion with a piece of plywood or something to get them to slip into
place. Do not remove the form until the wall of the dome has completely
covered it, or else you run the risk of the arch splaying out and collapsing.
The Loft Joists
 Once you arrive at the level where you want the loft to be, the joists
for this can be placed right on the bag wall and shimmed to be perfectly
level. You can see that these are also kept evenly spaced and vertical
with blocking nailed between them. I used 2X8 inch (4X20 cm) joists
for this loft, but small logs could also have been used. With logs,
they can be pre-drilled and pinned to the bag wall with pieces of 1/2
inch (1.3 cm) steel.
Once you arrive at the level where you want the loft to be, the joists
for this can be placed right on the bag wall and shimmed to be perfectly
level. You can see that these are also kept evenly spaced and vertical
with blocking nailed between them. I used 2X8 inch (4X20 cm) joists
for this loft, but small logs could also have been used. With logs,
they can be pre-drilled and pinned to the bag wall with pieces of 1/2
inch (1.3 cm) steel.
For Email contact go to About Us
Established in 2001, GreenHomeBuilding.com is primarily a labor of love. Kelly, and the GreenHomeBuilding team of experts, have answered thousands of questions for readers over the years, and we continue to publish up-to-date information about increasingly important sustainable architecture. If you feel moved to assist us in this work, your kind donation would be much appreciated; this can be easily done through our PayPal account:

VISIT OUR OTHER WEBSITES:
[Natural Building Blog] [Earthbag Building] [Dream Green Homes]
Disclaimer Of Liability And Warranty
I specifically disclaim any warranty, either expressed or implied, concerning the information on these pages. Neither I nor any of the advisor/consultants associated with this site will have liability for loss, damage, or injury, resulting from the use of any information found on this, or any other page at this site. Kelly Hart, Hartworks LLC.